Improved Anti-Aliasing in Element 3D

Exciting news for a boring (but crucial) feature... Anti-Aliasing! Element 3D is about to get some powerful new options next week that will clean your clock! Or at least your edges with impressive Super-Sampling!

Anti-Aliasing Comparison

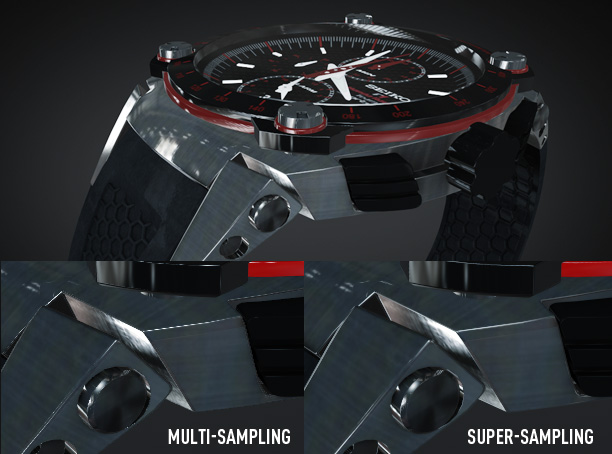
What is anti-aliasing? Basically it's the method used to reduce jagged artifacts in your renders with sharp highlights or reflections like the above example.

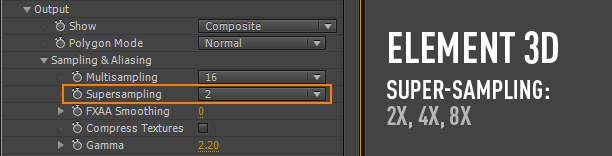
Currently Element 3D uses hardware Multi-Sampling which is very fast but with extreme highlights and thin edges, some renders may look flickery or jagged. Not any more. We're listening to our customers and so we created an impressive new solution called Super-Sampling.

Key Benefits:
-Maintains crisp image quality and textures
-Smooths sharp edges and highlights
-Improved clarity of high-poly detailed models
-Easy to use, just turn it on!

Super-Sampling basically renders your frame "super" large and then re-samples down to the frame size. This allows more detail to be saved and smoothed properly from the extra data. But, it does this on the GPU using a special render method.

The new method will add a minimal performance hit but it will NOT require additional MEMORY! (This is kind-of a big deal...) The other great thing is that you can turn it on when needed or just the final render. Element is all about control!

To give you an ideas of the performance... A 10 second render time will be around 20 seconds with 2X Super-Sampling. Not too bad considering Element 3D is already blazing fast!

Available Next Week:
This update will be free to current and new customers of Element 3D and includes many bug fixes and improvements. If you think we're going to let this product stand still, watch out!

Element 3D Available in the Video Copilot Store

Watch Element Tutorials and videos here

POSTED:
13 years ago
Element Examples:

Here is a clever use of our new Plug-in Element 3D by Serge Mustu using pre-fractured text in creative ways.

I even have more tutorials planned this week and also a 3D Tracking tutorial to talk about integrating 3D with live-action footage. More importantly though, we'll learn how to manage a scene with 3D tracking data and not have everything in weird places and crazy scale values. Should be fun as we push the limits of AE!

Element 3D is now available!

Reminder we are looking for experienced C++ Programmers if you would like to join our team!

POSTED:
13 years ago
TUTORIAL: Element 3D Particle Replicator

Here is new tutorial that shows how to use Element 3D replicator options with many new tips!

Watch Tutorial on VC.

Watch in HD on youtube.

Included Tips:

  • Using position noise
  • Use 3D object as replicator shape
  • Use Layer alpha as replicator shape
  • Assign multiple objects to a single group
  • Create particles on the surface of a 3D object
  • Auto-Orientation and rotation options

UPDATED: Here is the final animation with Sound Design

POSTED:
13 years ago
Surface Displacement

Here is another technical example of integrating the animation engine with live action footage using our powerful new 3D object plug-in Element 3D. I'm currently working on a 3D camera tracking tutorial that should make it easy to work with 3D tracking data inside of After Effects. Once the footage is tracked, it is easy to add objects and change the scene around, you could even add mini-choppers! Think of the possibilities... what will you create?

POSTED:
13 years ago
No Helicopter Parking!

It's hard enough to find parking but why do people have to use up two spots!

Here's another experiment using Element 3D to simulate shadows for this mid-sized helicopter. Mini-Chopper are Compact and great for traveling! Also great for shadow examples in small spaces.

Element 3D doesn't do native shadows (yet...) but using some simple techniques I was able to cast realistic looking shadows underneath the helicopter. Sometimes a simple black solid with a mask will work and for more accurate shadows you can even use a copy of the model from a top view.

I even placed colored lights in the scene to match the environment lighting from several angles.

Element DOES have Ambient Occlusion so if you need inner-object shading, don't forget to use the Ambient Occlusion options to add depth to your scene. See the example below:

I'll be making some short tutorial tips for this technique and others and remember these work well in other situations besides working with Element 3D, like using particles or stock footage that need shadows to integrate with a scene better.

See sample image

POSTED:
13 years ago